Things You Must Know About Violin Bowing
Bowing is crucial for violin learners, especially beginners. It is also what violin teachers focus on during beginners’ violin lessons. We are going to talk about some bowing techniques and various bowing strokes in the text below.
Bowing Techniques Which Should Be Taught by Violin Teachers on Violin Lessons
Violin teachers should tell students that the way they bow their instruments is critical to their health and performance. Incorrect bowing ways such as poor wrist-hand-arm alignment, incorrect motion, and incomplete/over extension, can cause chronic physical issues. On the other hand, poor bowing techniques may impact violin sounds during performances and result in weak, watery, bouncy and/or inconsistent tones, not to mention the intolerable squeaks.
Here are 4 tips that will make an improvement in students’ bowing techniques and violin sound.
1. HOLD THE BOW CORRECTLY
As we mentioned above, correct bowing hand is significant. How you hold the bow determines the pressure and angle of the bow on the strings. Too much, too little, too angled, etc., can affect the sound. Ultimately, bow grip should be so comfortable that you don’t have to think about it. Just allow the hand to feel stable, in control, flexible and relaxed.
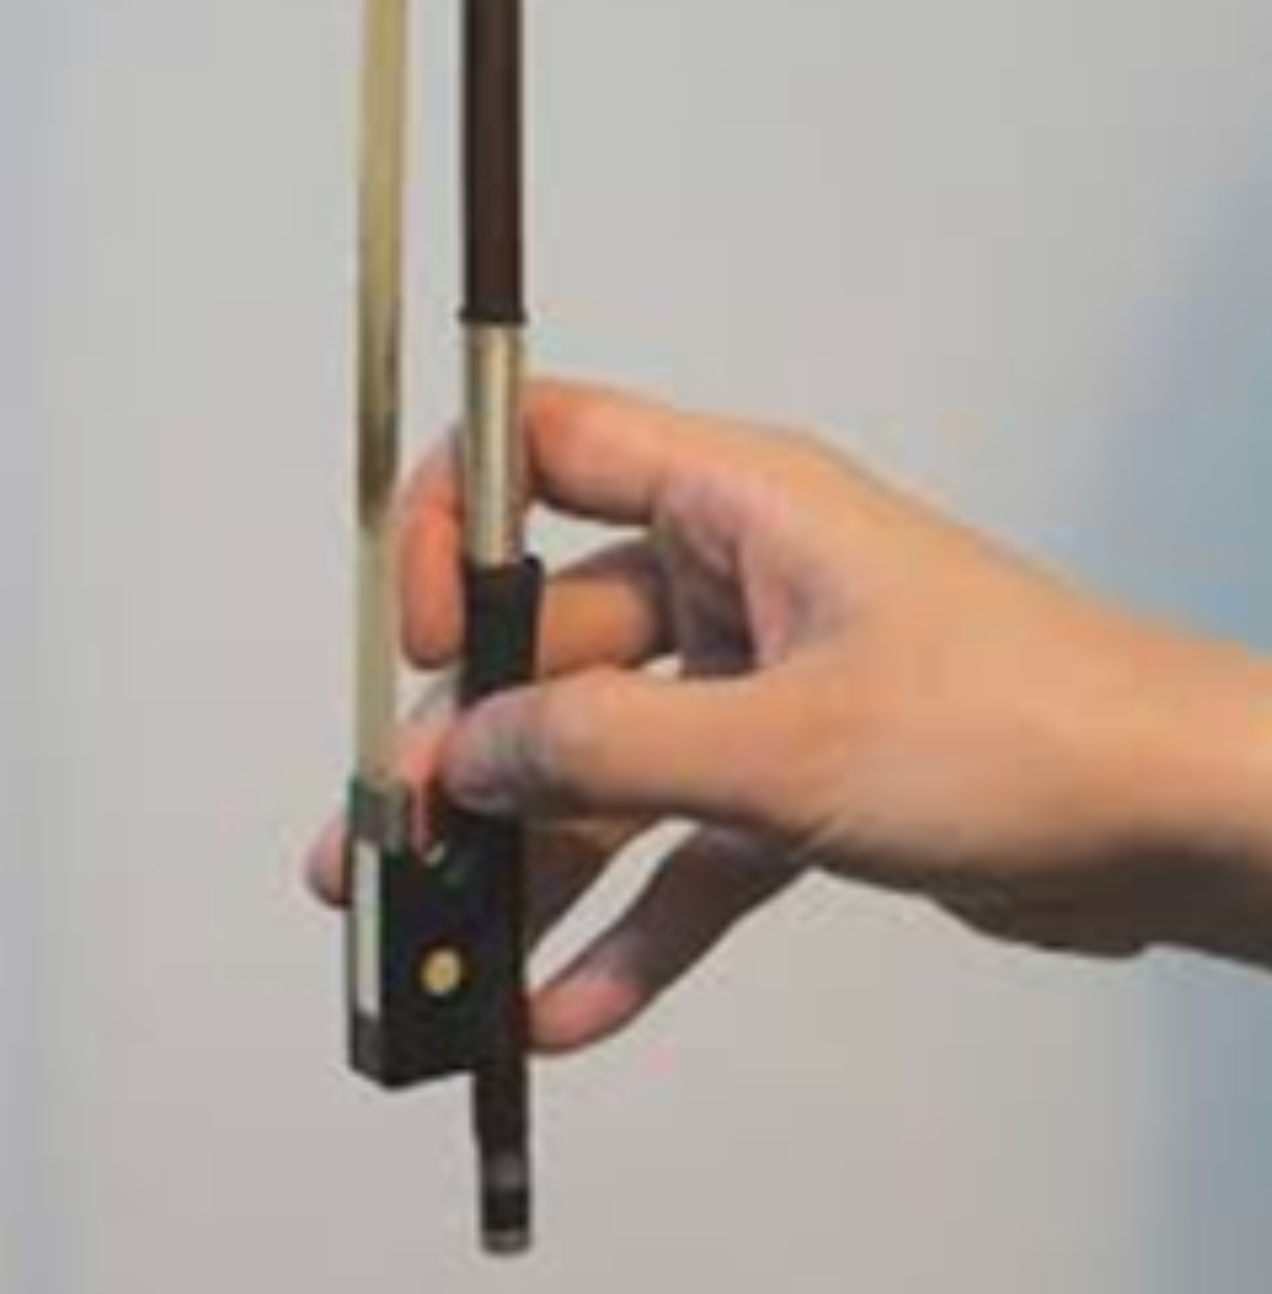
To find your natural grip, you can place the hand palm up, curling your thumb towards your middle-ring finger and relaxing. Now flip your hand back around. This is your natural grip. Replicate this position when you place the bow in your hand.
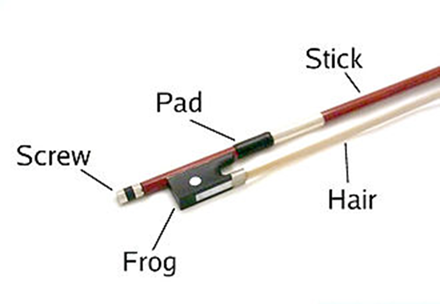
Rest half of your thumb-tip on the frog “bump” while the other half rests on the stick. The part right below the thumbnail will rest on the bow hair for support. Let the other four fingers rest in their natural position, with the first three fingers curling over the stick while the first finger rests gently on top. Your forearm may rotate inward just a bit, and the result is a relaxed, comfortable but controlled bow grip.
2. KEEP YOUR ELBOW AT A RIGHT ANGLE
When you stand in front of a mirror, with your bow on the A string, halfway between the fingerboard and the bridge, then you should be able to picture a square, with imaginary lines running from shoulder, to elbow, to the line made by your bow.
Readjust, bow across the strings and maintain that squared position. Now, run through a basic, 15-minute warm-up and watch to see if your arm maintains the squared position when you change strings. Adjust accordingly.
3. KEEP THAT BOW IN THE MIDDLE — AND THE MIDDLE
This one is a two-for-the-price-of-one bowing tip. In the beginning, and even at intermediate levels, it is important to keep your bowing to the middle of the bow itself (not too close to the frog or the tip), and to move the bow across the mid-space between the fingerboard and the bridge.
Regularly check both of these positions and you will gain better bowing control as well as a straight bowing performance technique, both of which are admired by violin teachers, audiences and musicians.
4. KEEP THE BOW FLAT ON THE STRINGS
It is true that experienced violinists tilt their bows a bit. Moreover, they have perfected their technique and have an inherent understanding of how to tweak the bow angle achieves a desired sound. As a beginner or intermediate player, however, it is better to keep the bow flat on the strings for control and depth of sound. Over time, you will be able to relax this rule a bit.
These violin bowing tips are worth making a part of your regular violin practice and overall awareness. The result will be an enviable technique that allows you to tackle any piece you wish.
Various Bowing Strokes Violin Players Should Grasp
In this article we divide bowing techniques into four categories: detaché, martelé, spiccato and others.
1. Detaché
Detaché is a separate stroke, down and up, with a healthy tone and a seamless bow change. It is often played in rapid succession and it is very useful, because it is in almost the entire repertoire on violin.
In detaché collé, you perfect a ‘slow motion’ spiccato and lift the bow at the bow changes.
In detaché porté, you emphasize the beginning of each bow stroke using a higher bow speed without pressure accent.
Son filé is a bowing technique in which you make a deep and full sound.
In legato you play multiple notes on one bow stroke. This gives a fluent sound. In sheet music you see a slur above the notes.
Portato is an up bow with stops. It is a little similar to legato as you play multiple notes on one bow stroke, but you stop your bow between the notes without accents.
Chord is to play three or four notes at the same time.
2. Martelé
Martelé is often the second bowing technique you learn on the violin. In martelé you don’t make a silent or seamless bow change, but there remains ‘air’ between the notes. Also every note begins with an accent. Usually you put the weight of your arm through your index finger into the bow and release it when the bow stroke starts.
In martelé collé you lift the bow at the bow change. This looks a bit like slow motion spiccato or detaché collé.
Martelé lancé means a longer bow stroke with higher bow speed at the beginning of the note. This looks a lot like detaché porté, but with firm accents.
Staccato and martelé are mixed up sometimes. Often staccato is used to describe multiple martelé notes on one bow stroke.
Flying staccato leaves the string between mulptiple martelé notes on one bow stroke. Your bow bounces, but you control the movement.
Fouetté is the middle between spiccato on the string and a detaché with accents. Most of the time it is played on the upper half of the bow.
3. Spiccato
Spiccato uses the natural jumping of your violin bow. The bow leaves the string at the bow changes and the bow strokes are short. It is important in spiccato that your wrist and fingers make smooth movements and you are not doing the spiccato with your entire arm.
Sautillé is done in a high tempo and played higher on the bow than spiccato. In spiccato your hand and the natural bounce of your bow work together. In sautillé you do less and your bow bounces more naturally.
Flying spiccato is to play several spiccato notes on one bow stroke and you bow almost on the same spot of the bow. There is an almost vertical jump.
In ricochet you use the natural jumping quality of your violin bow and play several notes on one bow stroke. It is like a pebble bouncing over the water surface.
Jumping arpeggio is to apply ricochet in broken chords.
4. Others
There are many more sounds you can make with your violin bow.
In tremolo you make short bow strokes at the tip.
In col legno you turn the bow upside down and you play with the wood on the string.
Sul punticello is bowing near the bridge causing a classy sound.
Sul tasto is bowing near or above the fingerboard with the soft sound.
Flautato is bowing with a high bow speed and little pressure creating a whistling transparent sound.
For violinists who use violin apps, perfecting bowing techniques works for their better performances on violin apps. On the other hand, violin teachers are supposed to go through all bowing techniques and strokes for students during violin lessons.
Have a HAPPY practice!!
More Violin Articles:
Teaching Violin Students to Read Key Signatures
Solfeges used in Violin Lessons
How to Choose Right Violin Strings
Also, check out violin sheet music on Violy App~
#ViolyPractice makes Perfect!!
Follow us on: Violy.app